
As the organizer of the MS Excel Toronto Meetup group, I wanted to find a tool that would allow us to continue to host the meetup sessions online after the Covid-19 outbreak. The requirements for the tool were the following: to allow me to run a webinar-type session with one or more presenters and someone else helping to manage the attendees’ questions. I searched and inquired around and received a wide variety of tips from which two tools stood out: Microsoft Teams (Teams) and Zoom.
Zoom seems quite easy to use and has been trendy for the past few months until major security issues with this tool became known. After that, I am definitely not interested in considering Zoom anymore, but even before that, it would have implied a paid version to get the features to fit my event online requirements. I realized that if I already had Teams included on my Office 365 plan, then I would be better off taking advantage of that fact and all the other possibilities that Teams offer and that I was not using.
I set myself on a mission of discovering the options available with Teams to set up an online event. I set myself on a mission of discovering the options available with Teams to set up an online event. I am not an expert on Office 365 plans, and I had not used Teams until now. I thought that moving the meetup events to Teams would be a straightforward process, but it ended up becoming much more challenging than expected. And this already explains why Zoom has gained so much popularity. Not everyone would have had the same patience I did to navigate through Microsoft Teams’ puzzle of plans and ways of dealing with each functionality according to the Office 365 subscription in use. Still, I insisted on continuing my discovery journey, mostly because I did not expect it to be so complicated as it ended up being. In this article, I am sharing what I have learned.
For those walking the same path as me, my advice is for you to study all the information below. You may find that you need to set aside more time than expected to be able to deal with the technical aspects until all is finally ready for you to use Teams.
Options available on Microsoft Teams to host an online event
To set a scheduled online event on Teams, I am considering two options: Meeting or Live Event. If you are in the same quest as I was, the first question you need to answer is: Do you have an Office 365 license that is not a Home or Personal subscription? If your answer is not “Yes,” then Teams is not an option for you as an event host, unless you are ready to acquire a suitable Office 365 subscription. But if you check the price of each tool, you might find to be a better deal for you to switch to an Office 365 Business subscription than acquiring a Zoom license. As of today, a license of Office 365 Business Premium costs CAD 16.00 per user per month, and a Zoom Pro license costs CAD 20.00 per host per month. And Zoom is only Zoom… whilst Microsoft 365 Business Premium is Teams, Outlook, Excel, Word, PowerPoint, Exchange, OneDrive, and SharePoint, besides many other things. Not to mention that a meeting on Teams holds up to 250 attendees, and a meeting on Zoom only accepts 100 people.
I think these are enough reasons to consider Microsoft Teams and move to a proper Office 365 license if you have to.
Before going into the requirements to be the host of a Meeting or Live Event on Teams, please know that anyone can join a Live Event or a meeting as a participant, without even having an Office 365 account.
To have access to the functionalities on Teams that allow you to schedule a Meeting or a Live Event, you need an Office 365 account with the appropriate Office 365 license plan. Otherwise, you can use Microsoft Teams Free with any other Office 365 account, but it does not give you access to set scheduled Meetings or Live Events. If you have an Office 365 Home or Personal subscription, only Microsoft Teams free is available for you.
I know it sounds complicated. And it is! Microsoft sure does have much room for improvements in Teams when it comes to making things easier for the user. I created a diagram that I hope helps you to understand what your options are as a host of an online event (Meeting or Live Event) on Teams. Further below, I help you with the more technical questions. Keep in mind that any changes that you need to make on your Microsoft 365 admin center may take several hours to become effective and available to you on Teams.

More Information:
Office 365 licensing for Microsoft Teams
Differences between Microsoft Teams and Microsoft Teams free
How do I get access to Microsoft Teams?
Join a meeting without a Teams account
Attend a live event in Teams
Meeting vs Live Event
If you have a Home or Personal Office 365 subscription, you only have access to Microsoft Teams Free that offers many cool features, but not the ability to schedule meetings and live events.
To access the app with scheduled meetings and live events features, you need one of the following Office 365 license plans: Business Essentials, Business Premium, Enterprise E1, E3, or E5, Enterprise E4 (for anyone who purchased this plan before its retirement.)
To be able to Schedule live events on Teams, you need to have one of the following Office 365 license types: Office 365 Enterprise E1, E3, or E5 or Office 365 A3 or A5.
More Information:
How do I get access to Microsoft Teams?
Plan for live events in Microsoft Teams
The main differences between the two features are the number of participants and the way that participants can interact during the event. A Teams Meeting holds up to 250 participants, and everyone can have the capability of turning their microphone on and share their screen. The Live Event holds up to 10,000 participants, but the only option for attendees to communicate with who is presenting is by typing their questions or comments into the Q&A pane if the organizer sets the event to have Q&A. In summary, the Meeting considers that everyone attending is there to participate and speak if they want to; the Live Event works more like a webinar or a lecture, where one or more people are presenting, and the attendees are not to interrupt the speakers.
However, the number of participants and the ability to communicate offered to the participants are not the only two factors limiting your choices as the event organizer when choosing which setting to choose for your online event. When running a Live Event, you need to consider that if you are bringing in guests from outside your organization to present or help you with managing the Q&A pane, you need to be able to add them to your tenant as guest users (I talk about this further down.)
| Meeting | Online Event | |
| Maximum Number of Participants | 250 | 10,000 |
| Maximum duration | Expires 60 days after starting | 4 hours |
| Roles | Organizer
Participants |
Organizer
Producer Presenter Participants |
| Features available to participants | Mic control
Screen Sharing |
Q&A |
| Can be recorded | Yes | Yes |
| Other notes | Delay of about 20 seconds between the moment the presenter speaks and the moment the participants hear it. |
More Information:
Limits and specifications for Microsoft Teams
Meetings and calls
How to set up a Meeting on Teams
On Teams app go to Calendar on the left pane

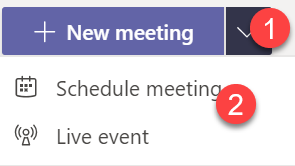
Click anywhere on the calendar area or click the button New Meeting at the top right corner and choose Schedule Meeting.
You can also schedule the meeting directly from Outlook, in which case you have the ability to attach files to the meeting invitation. When scheduling, use the button Teams Meeting to have Outlook generating the access link to the meeting.
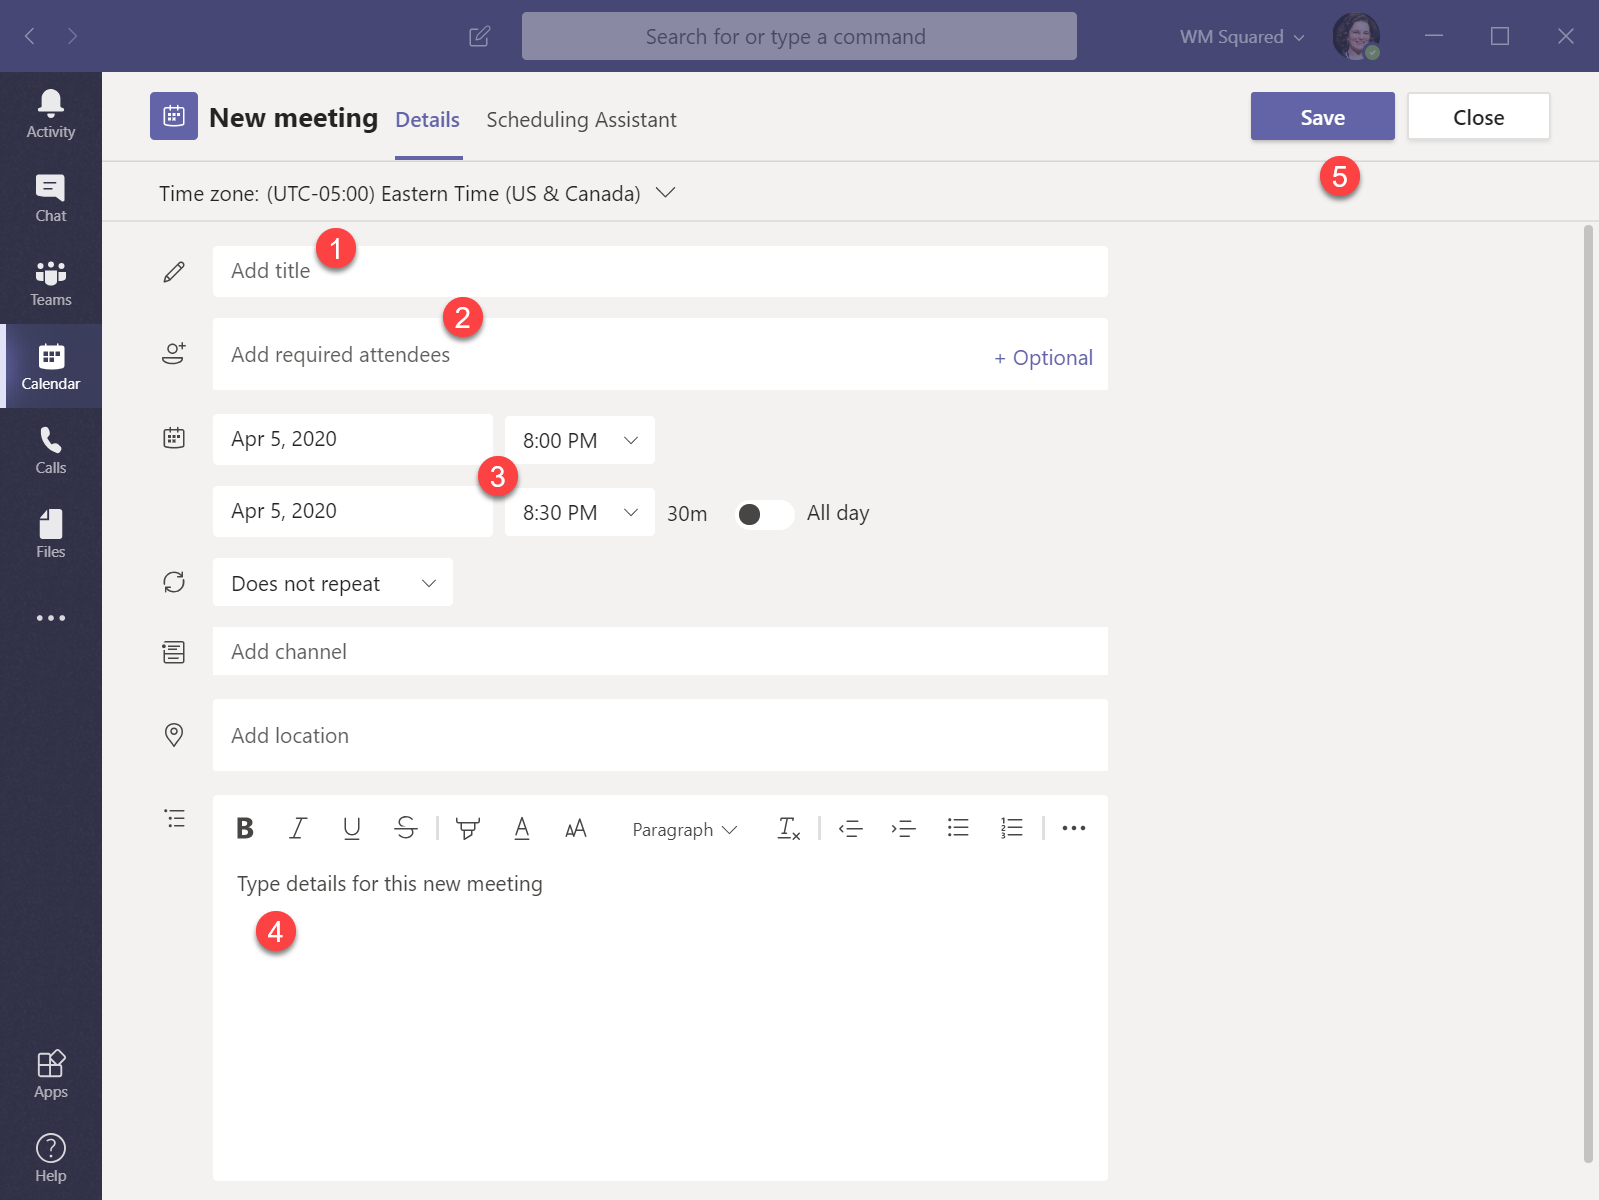
Add a title for the meeting, enter the email addresses of those you want to invite, set up the starting and ending date and time and any other details you need. Click Save.
You need to enter at least one email address (it can be only your email address) so that Teams generates a link to access the meeting in the body of the meeting invitation.
After saving the meeting, open it again. You can see the generated link for the meeting. You can right-click on Join Microsoft Teams Meeting, choose Copy Link, and then you can paste it wherever you want to share the access to the meeting with participants.
If you do not change any other settings, anyone entering the meeting has their microphones turned on by default, which can be disruptive when people join late through the meeting. To avoid this, I suggest you changing the meeting options so that participants enter the meeting as attendees by default, meaning they enter the meeting with their microphones muted. The attendees can share video and participate in the session chat area. You can change the role of any participant from Attendee to Presenter. Both the Organizer and the Presenters can share content and modify other users’ roles.

To change the meeting settings, click the link Meeting Options in the meeting invitation. Teams takes you to a web page where you can define who can enter the meeting immediately or wait at the lobby for the Organizer or a Presenter to let them in. More importantly, this is where you get to define who is assigned a Presenter role. Only those with this role can speak to the meeting participants and share content. I find this last setting is crucial to run the online event without unnecessary interruptions. If you choose that everyone can present, all the participants enter the meeting unmuted by default.
More information here:
Change participant settings for a Teams meetings
Roles in a Teams Meeting
How to set up a Live Event
Setting up a Live Event is reasonably simple and straight forward if all the people you want behind the scenes are only you, or only people from your organization, or federated organizations. (I am mentioning this, but I am not going to explain what it means at this point.)
The people behind the scenes besides you are the Presenters and the Producers, and I describe these roles below. If you need to bring people to these roles who are not in the same tenant as you (rule of thumb: their email does not have your company’s domain at the end,) then you need to add them to your tenant. I explain how you can do this in the section How to add your Live Event presenters and Producers as Users of Your Tenant.
On Teams app go to Calendar on the left pane

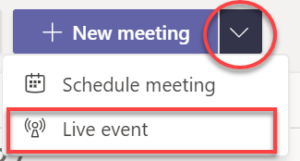
Then, on the top right corner select New Meeting > Live Event.

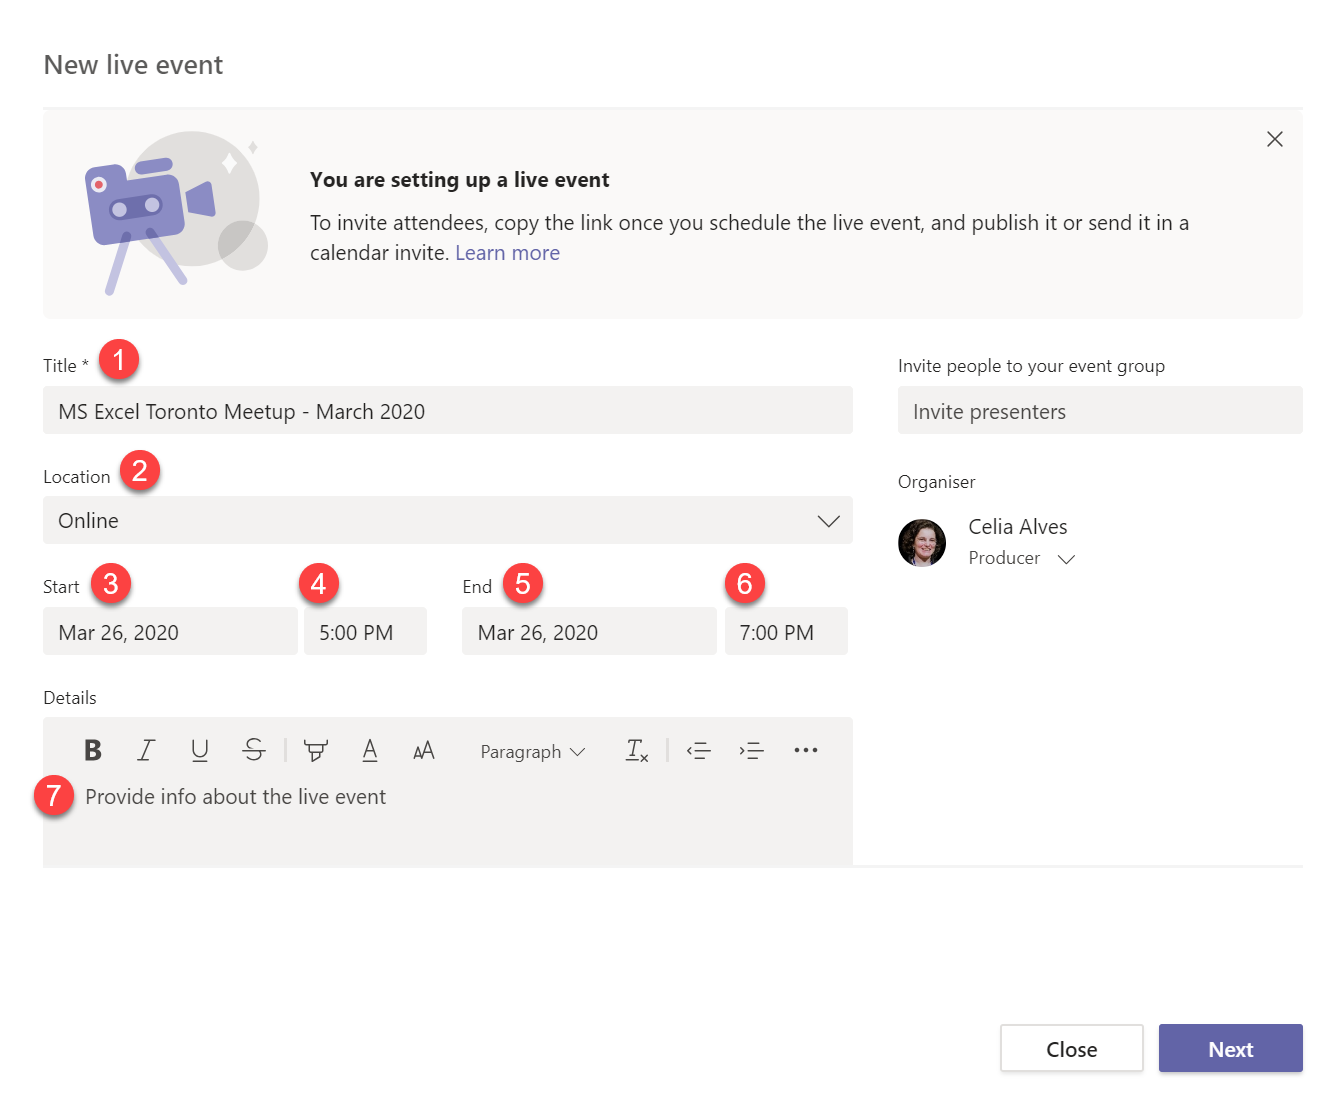
On the left side of the new dialog box fill in the Title of the session, location, start and end date and time and a description.
On the right side of the new dialogue box, fill the address of each person that you want or invite as presenter or event coordinator (type in and then click below.)
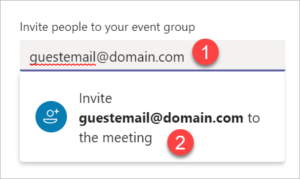
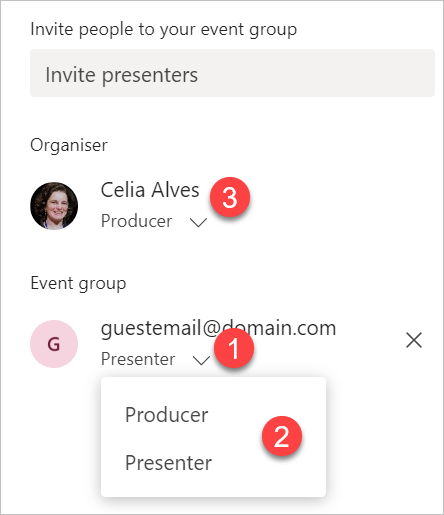
After the name of the guest is added to the list below the organizer, you can define the role for that person:
- Producer – if this person is going to control what shows on the screen, deciding which pieces of content and video from the ones available are shown at each moment.
- Presenter – if this person is going to talk to the audience and/or present content.
Both Producers and Presenters can interact with the participants throughout the Q&A panels.
You can also change your role.
Click Next on the bottom right side corner.
On the next dialogue box, make sure you scroll down to go through all the settings available.
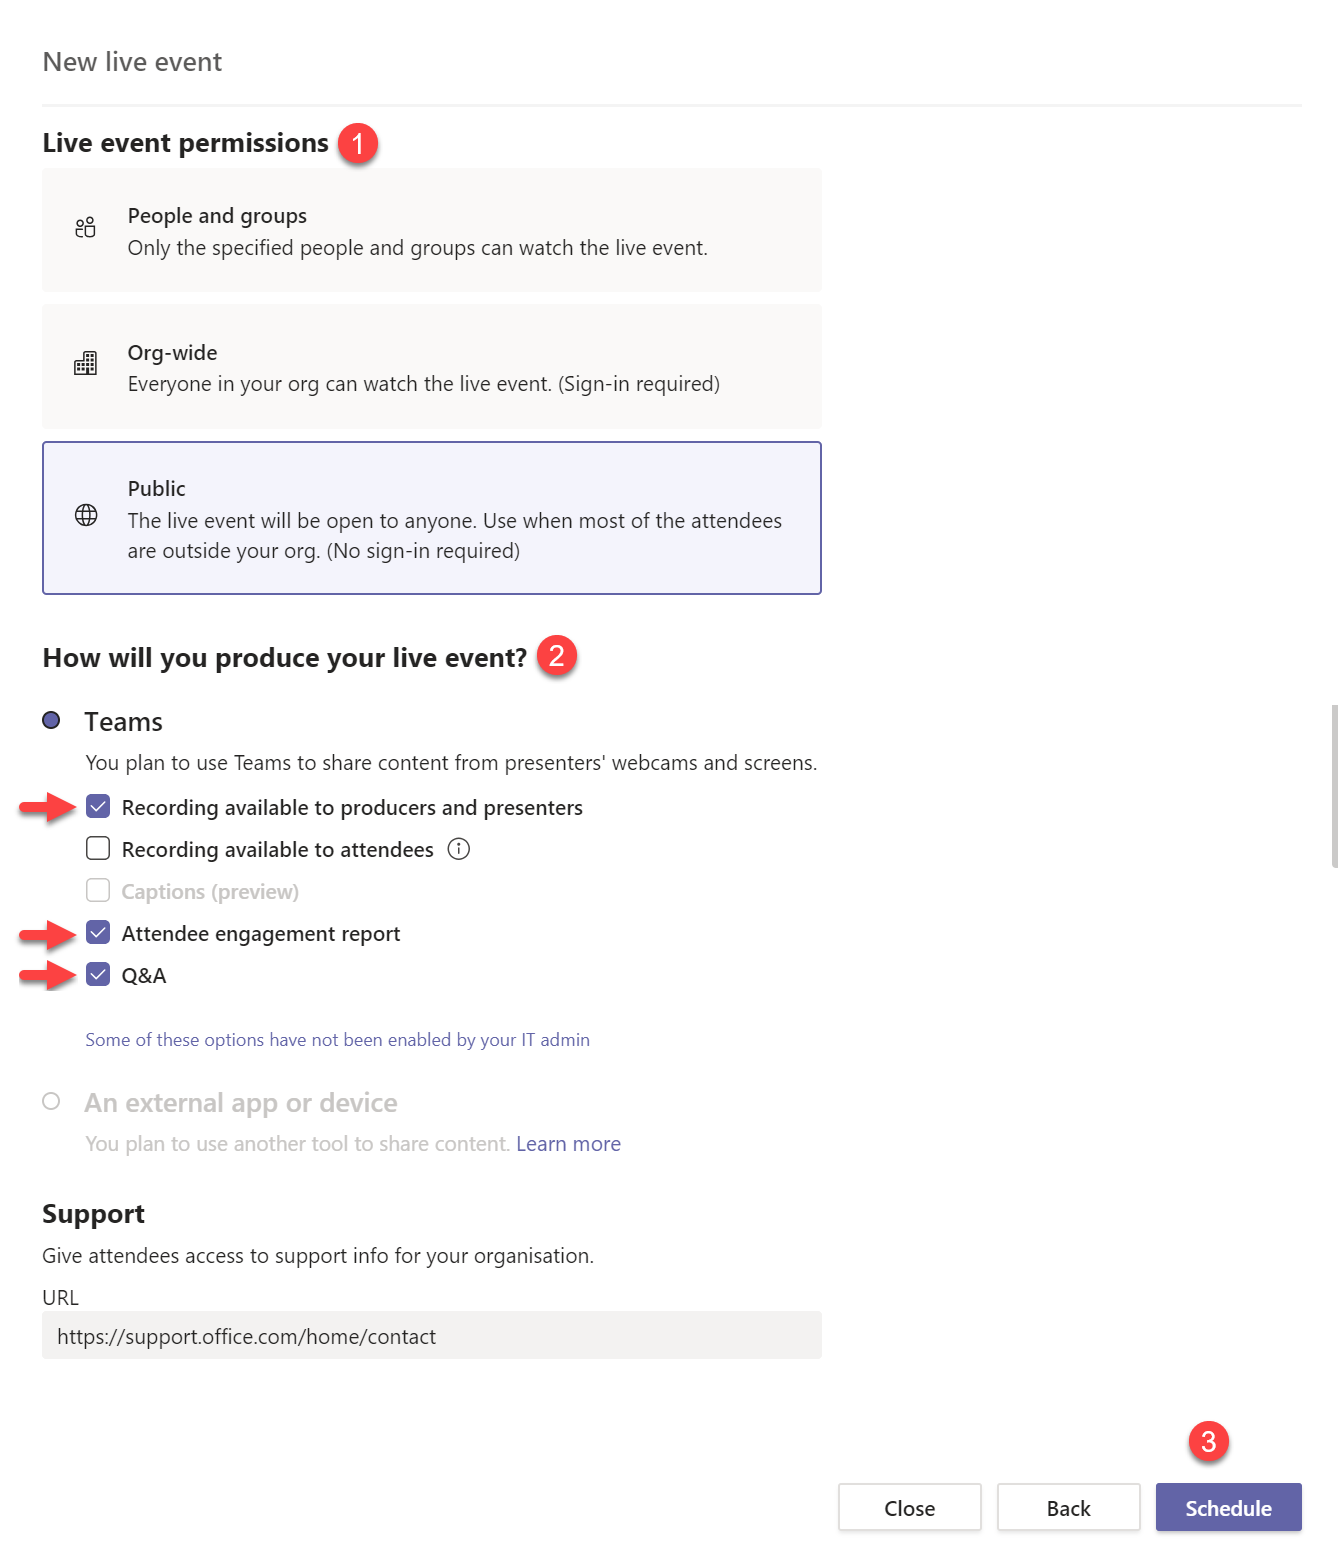
Choose the Live Event permissions according to your preference.
If you want your event to be available for Public Access and that option shows grey/disabled, see the section below about How to enable Public Live Events in Microsoft Teams for selected users.
Set “How will you produce your live event?” as per your preference.
I recommend putting a checkmark at least on the following options:
- Recording available to producers and presenters – a few hours after the event, a video recording file becomes available for you to download.
- Attendee engagement report – a few hours after the event a CSV file becomes available for you to download, reporting who attended and some details about the type of activity of each user during the event.
- Q&A – if you want to give attendees the possibility of interacting with the event producers through chat, you need to activate this option; otherwise, the participants cannot communicate with the event producers and. After the event, a CSV file becomes available for download with all the conversation posted on the Q&A panel.
When a participant posts a question in the Q&A section, the producer has the opportunity of responding to that question publicly for all the attendees to see, or just privately, where only the person posting the question sees the answer.
Click Schedule.
The option “Recording available to attendees” is also useful. It makes the recording becoming available to the attendees after the event is over.
The Captions option, showing disabled in the picture, can easily be enabled, and with that, you can make your event accessible to more people and more inclusive. See how to activate this option on the section How to enable Live Captioning on Teams. With this option enabled, you will be able to choose up to six languages for the live captioning during the event. Each user can activate and deactivate the captions on their end as they want.
On the next dialogue box, click Get attendee link – to copy the link that you need to send to the event attendees or where you advertise the event.
An important suggestion is not to publish the link you get from Teams directly. Instead, use a URL shortener like https://bitly.com/ so that you can make changes to the main link (for example, if you edit the event scheduling details) without having to resend or repost the link to the attendees.
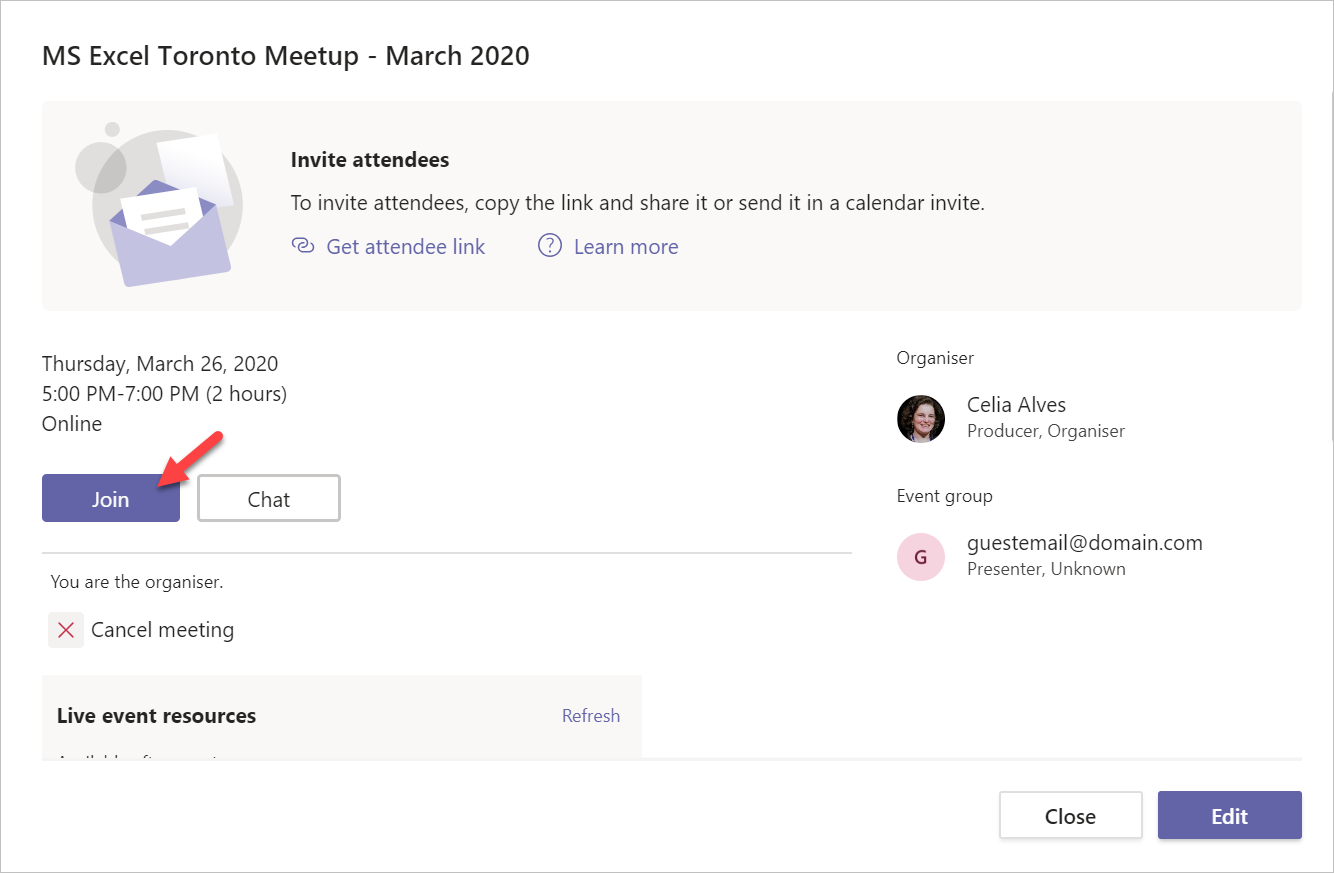
Then, you can either click Close to leave the event window and come back when you are ready to start or click Join to join the event pre-live window immediately.
Please note that you should not forward this invitation to anyone. The participants access the event through the link that you get when you click “Get attendee link” and the presenters receive an automatic email when you set them on the previous window and schedule the event.
If you need to invite more Presenters or Producers, go to the Calendar on Teams, open the event’s window and click Edit to add or delete any member of the group.
If you need to get the link for the attendees later, go to the Calendar on Teams, open the event’s window and click Get attendee link to copy the link to your clipboard.

The presenters and producers receive an email with an invitation to join the live event and need to use the “Join the live event” link contained on the invitation email to join the event and be able to share content. Before that, though, they need to make sure they log into Teams under your tenant. I explain how to do this in the section How to add your Live Event presenters and Producers as Users of Your Tenant.
Do not send this meeting inviataion to the participants. Instead, they are to join using the link at the “Get attendee link” that you can copy from the event window, in Teams calendar.
When it is time to join the live event, the Presenters and Producers needs to click the link they received by email. They are prompted to join using the web app or the desktop app. Presenters and Producers need to use the desktop app; they cannot present from a mobile device or from the web app. After clicking the link to join the event, the Presenters and the porducers have the opportunity to install it if needed. The process of installation is easy and quick.
The Presenters or Producers do not need to have an Office 365 Business account. They need to be added to your tenant as guest user.
Starting a Live Event
Before you start the live event, make sure all the presenters and producers have access to your tenant and that you test everything quite in advance to sort things out.
On Teams app go to Calendar on the left pane.

Find the event on your calendar and click on it to open it.
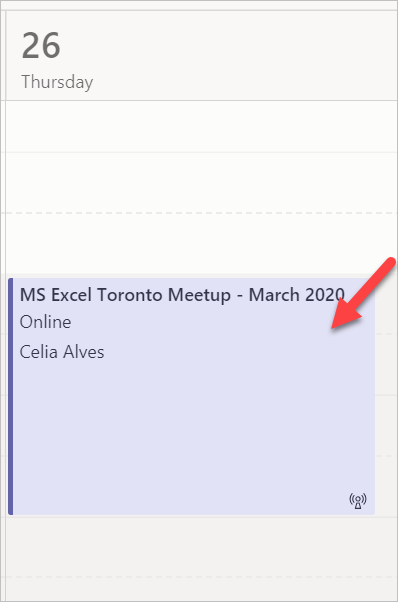
Click Join and then Join Now.
The explanation below is assuming that you are the event producer.
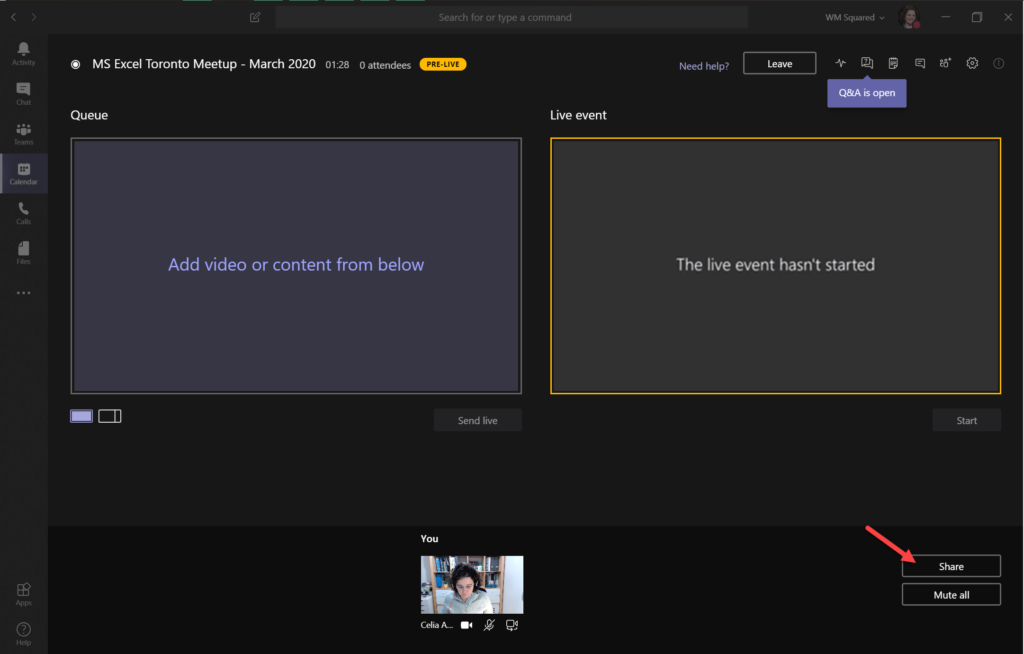
You enter the pre-live pane for producers where you can select the content to present to the audience.
If you need to share a file or a screen with your audience, other than just the video from your camera, open those files, or prepare those screens and then click the button Share on the bottom-right corner.
Then, pick from your windows and screens available what you want to share.
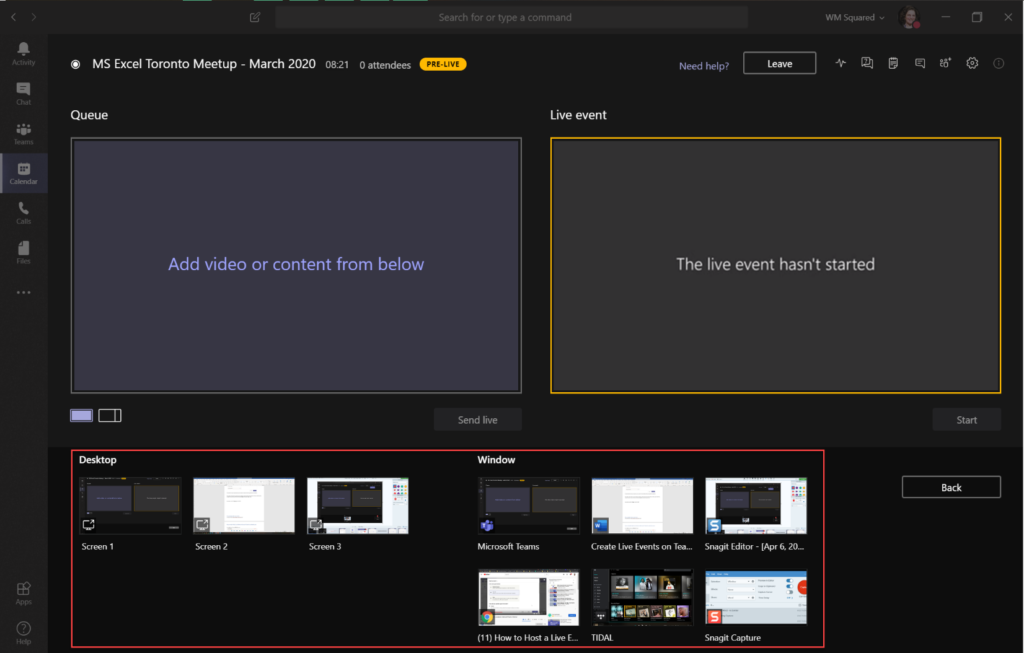
Any other presenter needs to do the same so the producers can put the next content on Queue to be shared later.
The next step is to choose between the two presentation modes available below the Queue window: content only, or content and video.
Then, click inside the Queue area and pick one item to fill in that area from the content made available by you and the presenters.
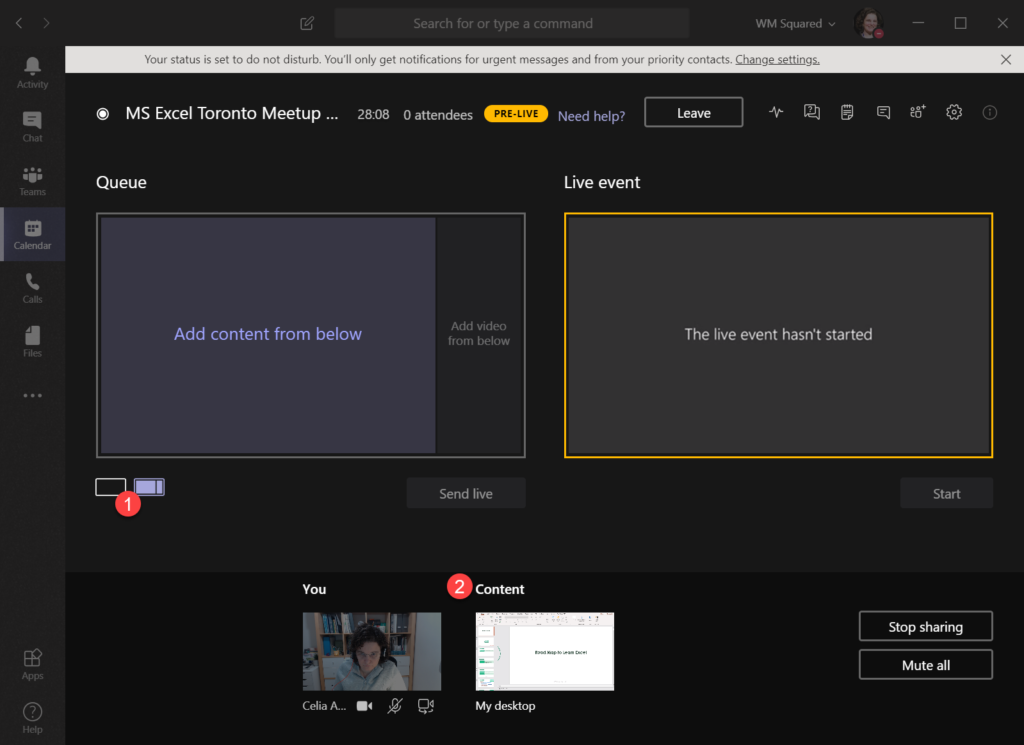
When the Queue pane is filled, the Send Live button becomes available.

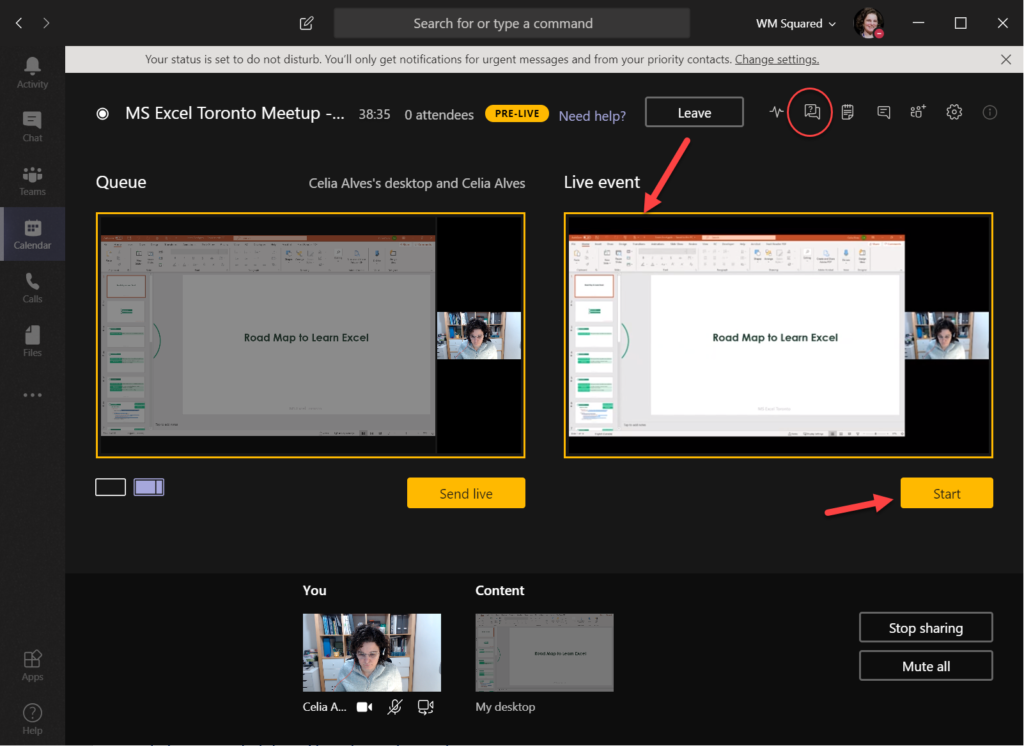
Click Send Live, and the Start button becomes available. The window on the right shows what the audience sees.
Remember: a live event can only be started once! Click Start to begin transmission and do not leave the event until it is finished. If you end the event, you and the audience will not be able to use the same link to get back.
At the top right-hand corner, there is a button for the Q&A (Questions and Answers) where the audience can type. One producer should be in charge of monitoring the Q&A pane to address attendees’ questions. Replies can be provided in private or posted to the public Q&A pane.
When you want to switch the content being shown to the audience, ask the presenter to click the button Stop Sharing at the bottom right, and then choose the next content from the list of shared content available.
Remember that there is always a delay of about 20 seconds from the moment the presenter speaks to when the audience hears it.
When the meeting is finished, click the button Leave at the top.
Files available after Live Event
Sometime after the meeting, you get access to some resources about the live event. Open the event on the calendar in Teams and click the link Refresh. You may have to wait a few hours after the meeting until the resource files are available.
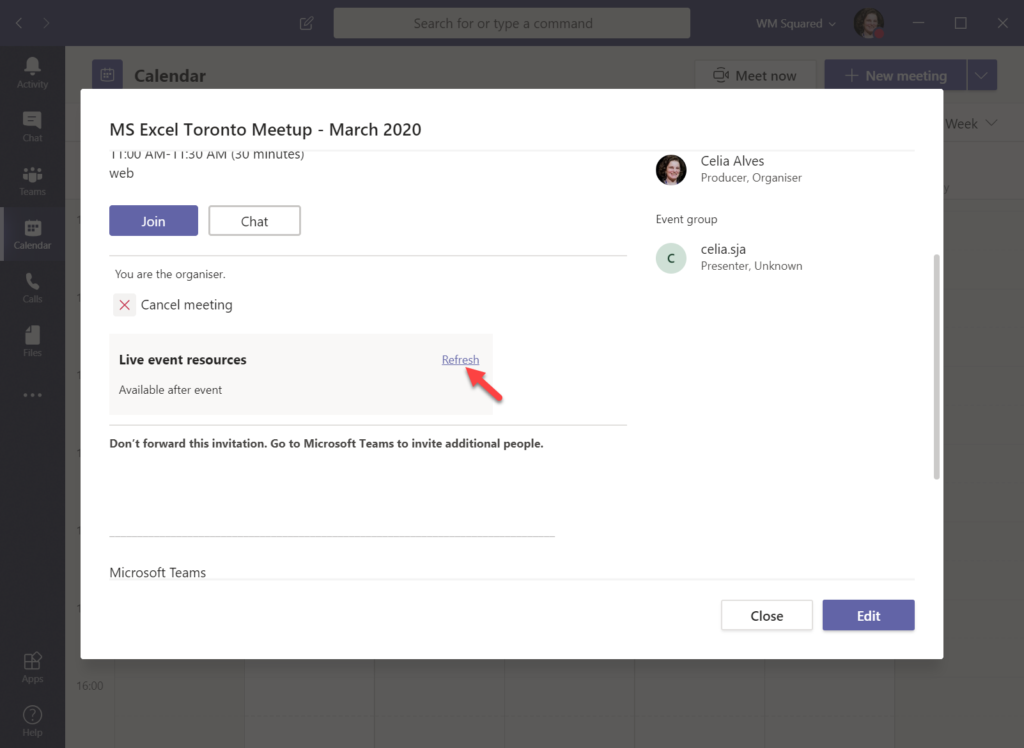
According to the settings you chose when scheduling the live event, some files become available to you. For example, for the settings that I suggested above, I received:
- a .mp4 file with the video recording of the event,
- a .csv file with the attended report
- a .csv file with the Q&A report
When the files are ready, you can click the icon to download them.
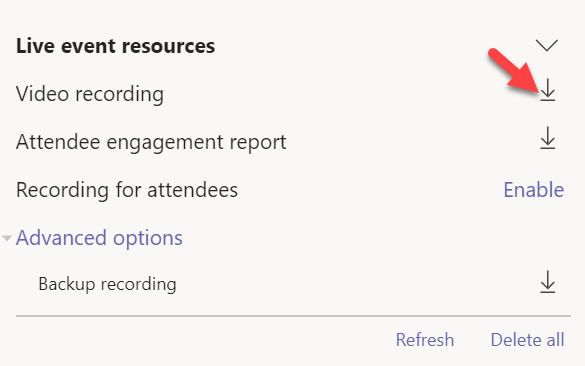
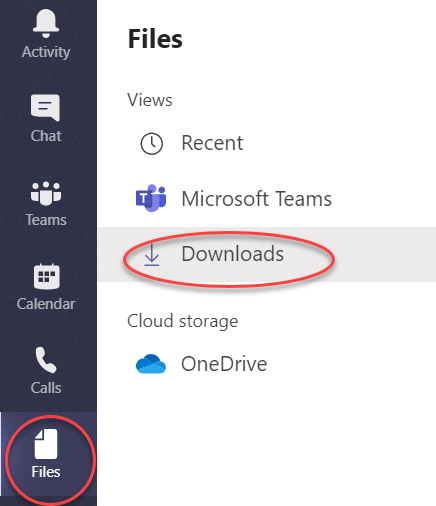
After downloading, the files become available on the Files section on Teams or on your Downloads folder.
How to enable Public Live Events in Microsoft Teams for selected users
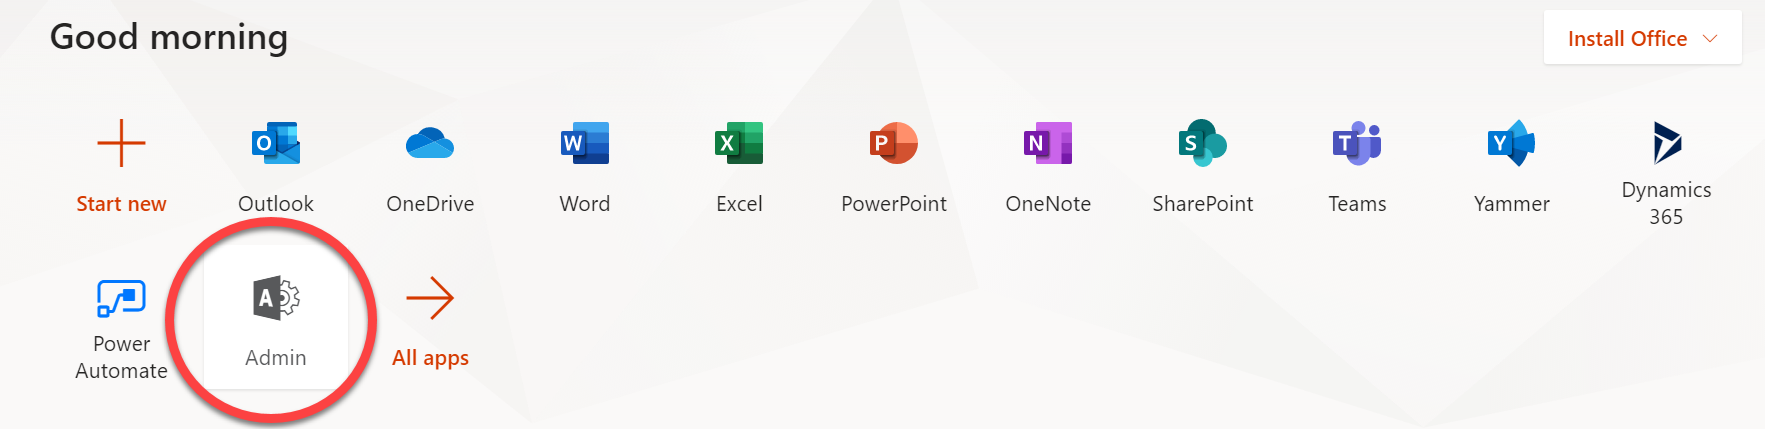
Go to admin panel of your Office 365 account
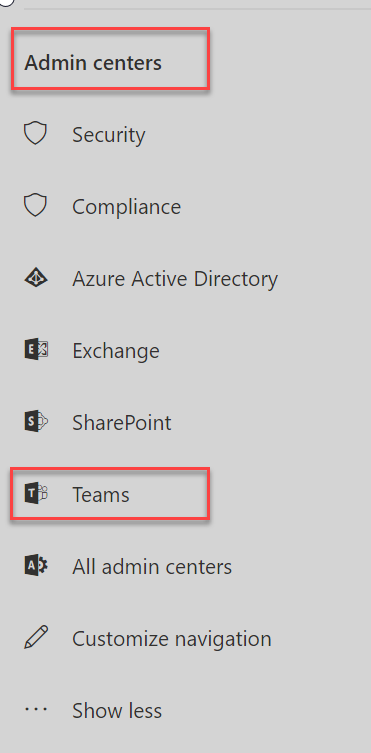
Under Admin Centers, select Teams (Click Show All on the left if needed)
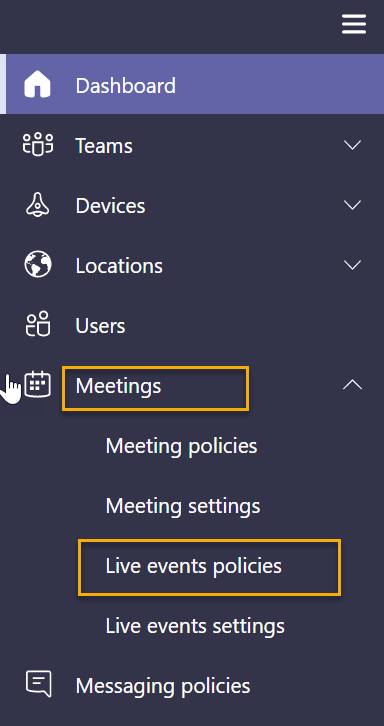
On Teams admin center select Meetings on the left and then Live Events policies.
If you want the new policy to apply to all the organization members, select Global, otherwise you might want ot create a new poilicy that will be applied to a few members of the organization only (more information here: https://docs.microsoft.com/en-us/microsoftteams/teams-live-events/set-up-for-teams-live-events).
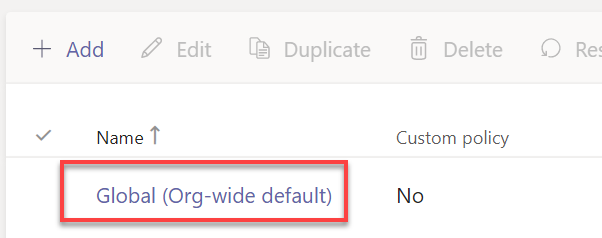
Under Who can join Scheduled live events choose Everyone.

Click Save
Please Note: This settings change can take between 2 to 24 hours to be rolled out and applied to your Teams app.

How to add your Live Event presenters and Producers as Users of Your Tenant
As mentioned above, if the organizer of a live event on Teams invites people external to the organization as presenters or producers, these people need to have access to the organizer’s tenant to be able to join as presenter or producer. Otherwise, when they click the link they receive on the invitation email, they will only be able to join as attendees.
The way I found to get this solved is the following:
- Go to Teams
- Create a Team for this purpose (for example, a Team named Live Event Producers and Presenters
- Add the external presenters and producers as members of that team. If needed, ask your IT department or see here how to turn on guest access to Microsoft Teams: https://docs.microsoft.com/en-us/microsoftteams/set-up-guests.)By adding your invited presenters and producers to a team on Teams, the system adds them as external guest users of the organization.
- The external producers and presenters receive an email informing that they were added as a guest to the team.
- If they have Teams already installed, it is best to open Teams first and Sign Out (click the circle with their picture at the top right-hand corner.)
- Then, the guest user should proceed to the email received and click the link “Open Microsoft Teams” available on that email.
- By doing that, the guest receives a request from your tenant to accept being added.
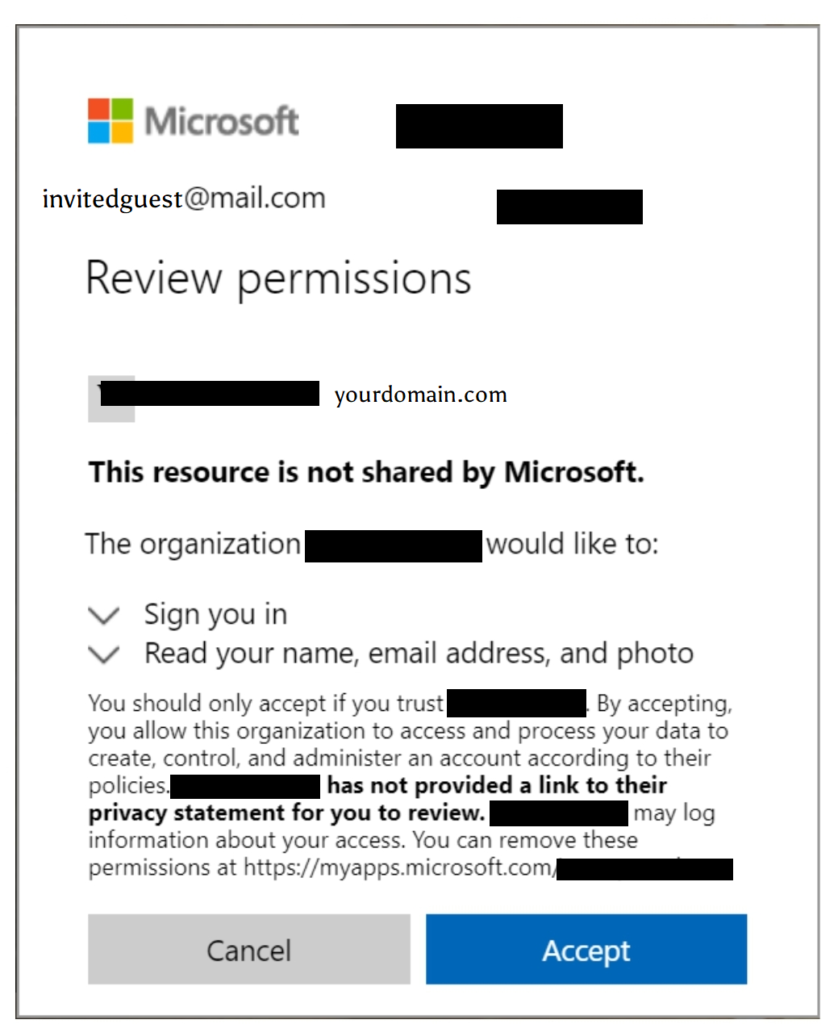
- After accepting, your guest user now has a dropdown menu to the left of their picture on Teams, showing the list of tenants they have access to. They need to click on your tenant’s name.
Here is my list as an example:
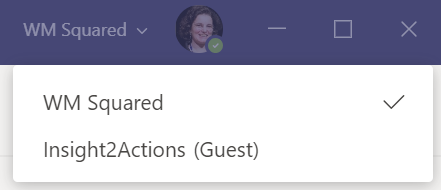
- Only after having made sure to have connected to your tenant as a guest, your external guest can go to the email with the invitation to join as presenter or producer of the event. This way, they enter the live event backend and are able to share content and access the Q&A space.
Before finishing this session, please note the following information available here:
“Licensing for guest access – Guest access is included with all Office 365 Business Premium, Office 365 Enterprise, and Office 365 Education subscriptions. No additional Office 365 license is necessary. Teams doesn’t restrict the number of guests you can add. However, the total number of guests that can be added to your tenant is based on what your Azure AD licensing allows – usually 5 guests per licensed user.”
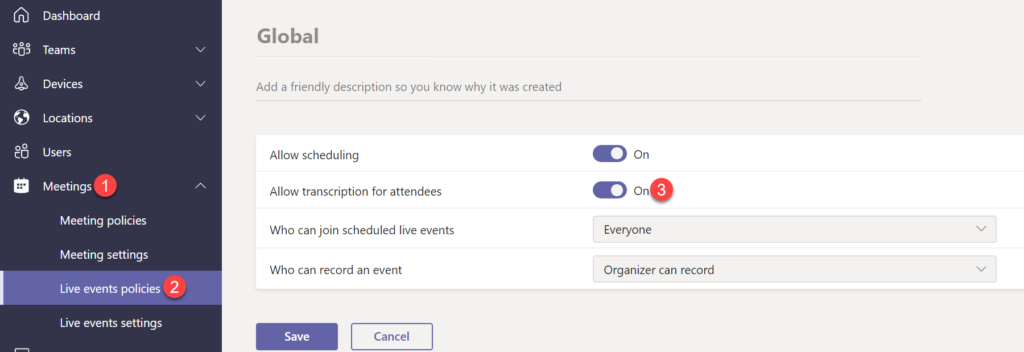
How to enable Live Captioning on Teams
Go to the Microsot Teams admin center, click on Meetings, and Live event policies and turn on Allow transcription for attendees.
More Information:
Gregory Petrossian’s article – full of valuable good practice tips and things to keep in mind when organizing and running an online event
The Collaboration Coach channel on YouTube has all the processes to run a live event on Teams summarized on their playlist Microsoft Teams Live Events.
Get started with Microsoft Teams live events
Gilbert Quevauvilliers’s article on running a live event.
What are Microsoft Teams live events?
I hope that you find this information useful and helpful to quickly set Microsoft Teams as your tool to run online events. I am available to collaborate with companies and help them set Teams for their employees. Please feel free to reach out.

Leave A Comment